To project leads
Manage your team
If you are an account coordinator, you may invite new users or revoke their access. In addition, you may view all your linked accounts by clicking Accounts in the top menu bar.

The default account is used when you submit a job without specifying a particular account. You may check account quota, usage, and jobs on this screen. Or click an account name to enter the account page.
There are two types of accounts: billing and consumer. Billing accounts can have sub-accounts but consumer accounts can not. However, only consumer accounts can submit jobs, on the other hand, billing accounts have monthly invoices.

Enter an account page, and you will see members of your account. Click on names to check their profile, or you may revoke their access. There are two ways of adding members, using the bottom-right area on this screen.
Invite existing users
If they are existing cluster users, you may invite them by email address. They will receive a notification and may accept or deny your invitation on their home page.
Create a new user
You may register for them if they are not in the cluster yet. However, please ensure to fill in External ID if they have an HKAF account.

Custom software
When the built-in software doesn't fit your needs, feel free to bring your software to the cluster. This article covers how you can do this in Lmod and containers and how to share it with your teammates.
Lmod
First, please study the official Lmod guide about Personal Modulefiles. Then we recommend you place your software and modulefiles in the group scratch file set. Make sure to make all directories and files readable by your group. If you don't want your teammate to modify it, make it writable only by the owner.
Following is an example of compiling git 2.38.1 and adding it as a custom module:
# define where to put our software and modulefiles
MODHOME=/pfss/scratch02/appcara
PKGPATH=$MODHOME/pkg
MODPATH=$MODHOME/modulefiles

# download source code and compile
cd $MODHOME
wget https://mirrors.edge.kernel.org/pub/software/scm/git/git-2.38.1.tar.gz
tar xf git-2.38.1.tar.gz
cd git-2.38.1
./configure --prefix=$PKGPATH/git/2.38.1
make && make install

# setup the module file
mkdir -p $MODPATH/git
cat > $MODPATH/git/2.38.1.lua <<EOF
local home    = "/pfss/scratch02/appcara"
local version = myModuleVersion()
local pkgName = myModuleName()
local pkg     = pathJoin(home, "pkg", pkgName, version, "bin")
prepend_path("PATH", pkg)
EOF
Now everyone who has access to your group scratch directory can use your new module with the following commands.
# use the custom module path
module use /pfss/scratch02/appcara/modulefiles

# check if our git is available
module avail git

# load the module and test
module load git/2.38.1
git --version   # you should see git version 2.38.1
Containers
The cluster is using Singularity. Containers are .sif files on the file system. You may extend ours, download from the internet or build your containers from scratch. Below lists a few ways to prepare software containers.
We recommend placing your custom images in the containers directory in your home or group scratch folder. So you and your teammate can see them in the web portal.
Pull from the internet
There are tons of container images on the internet. You may want to start by searching from some repositories:
Below are some examples of pulling containers from the above public repositories.
# put in the containers folder so web portal can see them
mkdir ~/containers
cd ~/containers

# Singularity Hub
singularity pull rstudio.3.4.4.sif shub://mjstealey/rstudio

# Singularity Cloud Library
singularity pull alpine.3.15.3.sif library://alpine:latest

# Docker Hub
singularity pull julia.1.8.2.sif docker://julia:alpine3.16

# NVIDIA GPU Cloud
singularity pull pytorch.22.09-py3.sif docker://nvcr.io/nvidia/pytorch:22.09-py3
Extend a built-in image
Sometimes we may want to prepare our image. The following example shows how to extend the built-in PyTorch image by installing some python packages.
First, let's create a gym.def file to instruct singularity on how to build our new image.
BootStrap: localimage
From: /pfss/containers/pytorch.22.09-py3.sif

%post
    pip install gym==0.24.1 gym[atari,accept-rom-license]==0.24.1
    pip install atari-py==0.2.9 pybullet==3.2.5
We are simply leveraging the pytorch.22.09 image and install the Gym library from OpenAI for reinforcement learning studies.
If you want to learn more about how to customize your image. Please study the official documentation.
Next, we will run the below commands to build the image.
singularity build gym.sif gym.def

# verify if our image is working
singularity exec gym.sif pip list

# move it to the containers folder, then we can run it in the web portal
mkdir -p ~/containers
mv gym.sif ~/containers
Quick jobs
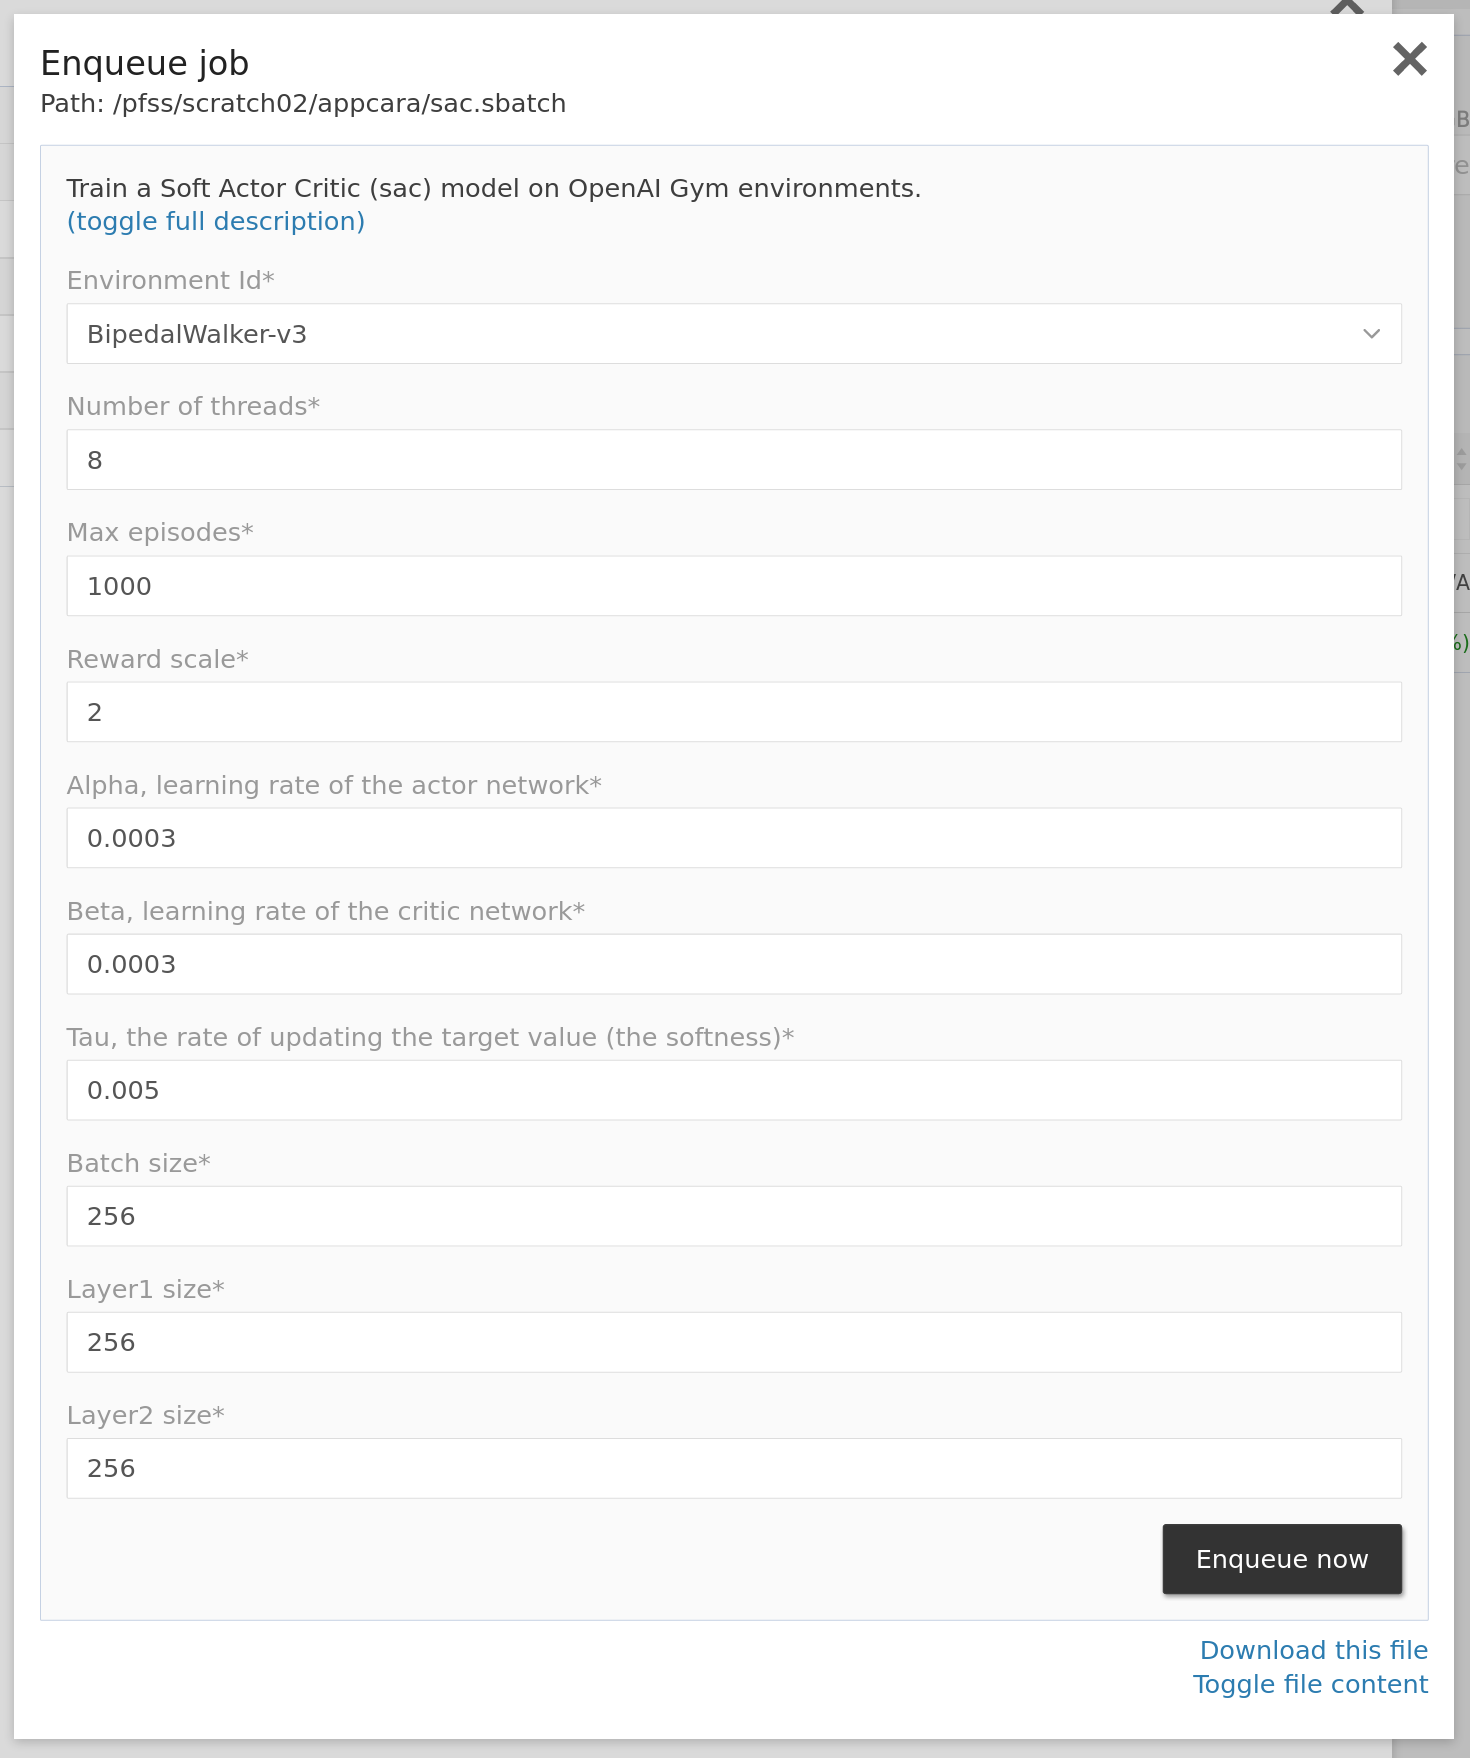
Quick job is one of our web portal's features. It is an excellent way to unify and speed up your team's workflow. For example, you may define what computing resources are required, what software to use, and where the output goes. You may also expose options to your teammate to fine-tune an individual run.
Quick jobs are typical .sbatch scripts. The portal will open a job launcher window when one clicks a .sbatch file. Then you customize the launcher behavior by optional metadata.
Below is a multi-GPU deep reinforcement learning task with a custom description and several exposed options.
#!/usr/bin/env bash

#SBATCH -J sac
#SBATCH -o sac.out
#SBATCH -p gpu
#SBATCH -n 8
#SBATCH -N 1
#SBATCH -c 4
#SBATCH --gpus-per-task a100:1
#SBATCH --mem-per-cpu=16000

<<setup
desc: Train a Soft Actor Critic (sac) model on OpenAI Gym environments.
inputs:
  - code: env_id
    display: Environment Id
    type: dropdown
    default: BipedalWalker-v3
    options:
      - BipedalWalker-v3
      - LunarLanderContinuous-v2
      - AntBulletEnv-v0
      - InvertedPendulumBulletEnv-v0
      - CartPoleContinuousBulletEnv-v0
      - PongNoFrameskip-v4
    required: true
  - code: num_threads
    display: Number of threads
    type: text
    default: 8
    required: true
  - code: max_episodes
    display: Max episodes
    type: text
    default: 1000
    required: true
  - code: reward_scale
    display: Reward scale
    type: text
    default: 2
    required: true
  - code: alpha
    display: Alpha, learning rate of the actor network
    type: text
    default: 0.0003
    required: true
  - code: beta
    display: Beta, learning rate of the critic network
    type: text
    default: 0.0003
    required: true
  - code: tau
    display: Tau, the rate of updating the target value (the softness)
    type: text
    default: 0.005
    required: true
  - code: batch_size
    display: Batch size
    type: text
    default: 256
    required: true
  - code: layer1_size
    display: Layer1 size
    type: text
    default: 256
    required: true
  - code: layer2_size
    display: Layer2 size
    type: text
    default: 256
    required: true
extra_desc: |+
  output model will be stored in ./sac_model
  loss for each episode is plotted to ./sac_loss.png
setup

module load GCC/11.3.0 OpenMPI/4.1.4

mpiexec singularity exec --nv \
  --env env_id=%env_id% \
  --env num_threads=%num_threads% \
  --env max_episodes=%max_episodes% \
  --env reward_scale=%reward_scale% \
  --env alpha=%alpha% \
  --env beta=%beta% \
  --env tau=%tau% \
  --env batch_size=%batch_size% \
  --env layer1_size=%layer1_size% \
  --env layer2_size=%layer2_size% \
  /pfss/scratch02/appcara/gym.sif python sac.py
There is a section colored orange that defines how it interfaces with users. It is in YAML format and consists of three sub-sections: desc, inputs, and optional extra_desc. The launcher renders the below form to capture the user's input. The system expects placeholders in format %input_code% in the file content and will replace them with the user input.
The built-in quick jobs
The three built-in quick jobs discussed in the previous section are also made of the above syntax. You may find them in the parallel file system.
- Jupyter Lab in /pfss/toolkit/start_jupyter.sbatch
- VNC in /pfss/toolkit/start_vnc.sbatch
- Run container in /pfss/toolkit/run_container.sbatch
Jobs, quota, and setup alerts
You may want to check the jobs teammate submitted to ensure they are reasonably leveraging your resources. This article covers how you check jobs, how the quota system works, and how we can set up alerts to let the system monitor for you.
Check running, queuing, and completed jobs
Job owners can inspect their jobs through the top-right corner dropdown. On the other hand, an account owner can review every member's jobs on the account page. So, click the account name you want to check from the Accounts page. Then, in the overview sub-page, you will see links to inspect jobs. Finally, click either running or completed jobs to open the jobs window.
In the running tab, you see jobs currently running under the selected account, their requester, the partition, the duration, and the per-job real-time CPU or memory utilization. You may cancel any job by clicking the cancel button.
In the queuing tab, you see jobs currently waiting inside queues, the partition they are in, and the requested CPU or memory. You may cancel or change its priority.
In the completed tab, there are jobs already completed or failed. Click the job ID to view the detailed charge and utilization status.
If you want to sort them by CPU or memory utilization, you may click the gear button at the top-right corner to toggle the columns of the table.
Setup alerts about utilization
To spot under-utilized jobs, we may inspect jobs on the portal in real time. But the system also provided a way to monitor it automatically. Switch to the settings tab on the account page, and you will see a job efficiency monitor section.

By default, the system notifies the owner if their job is using below 50% of either CPU or memory. The system will not count the first 10 minutes because we assume the application is warming up. You may play around with the settings for your need.
How quota works
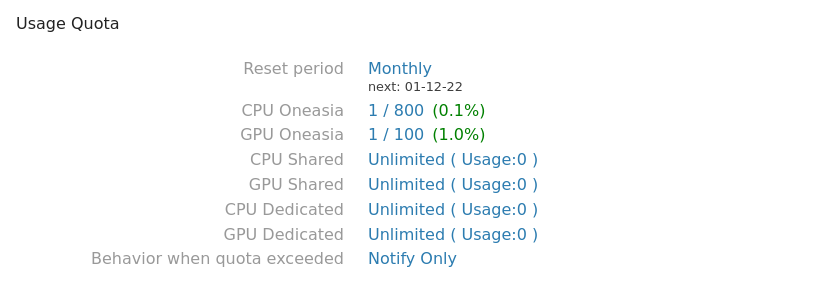
OAsis uses our quota system, which is different from a typical SLURM setting. It allows six meters setting instead of a combined total number.
- CPU Oneasia
- GPU Oneasia
- CPU Shared
- GPU Shared
- CPU Dedicated
- GPU Dedicated
As their names tell, they are referring to CPU and GPU usage over 3 node pools. The unit of CPU usage is the number of hours spent on one AMD EPYC 7713 core. On the other hand, the number of hours spent on one NVIDIA A100 GPU card.
Quota is applied on the account (group) level and considers not just your account quota but every upper-level account. For example, an institute may have 1,000 units of "GPU Oneasia" evenly distributed to 4 departments. And the departments can assign them to each project group. The system only accepts jobs when all levels (institute, department, project group) have enough quota.
The system supports a custom reset period per account. You may choose from weekly, monthly, quarterly, and yearly.
Check current usage and my quota
You may check them through the web portal on the accounts page.

You may also check them through the CLI client as the following:
$ hc quotas
# Account   | CPU/Mem Oneasia   | CPU/Mem Shared    | GPU Shared        | CPU/Mem Dedicated | GPU Oneasia       | GPU Dedicated
# appcara   | 0.2 / 800         | 0.0               | 0.0               | 0.0               | 0.0 / 100         | 0.0

# of if you prefer a JSON format
$ hc quotas -o json
# [
#  {
#    "account_id": "appcara",
#    "quota": {
#      "oneasia_csu": 800.0,
#      "oneasia_gsu": 100.0
#    },
#    "usage": {
#      "dedicated_csu": 0.0,
#      "dedicated_gsu": 0.0,
#      "oneasia_gsu": 0.047666665,
#      "shared_csu": 0.0,
#      "shared_gsu": 0.0,
#      "oneasia_csu": 0.16666667
#    }
#  }
# ]
Set quota and auto alerts
If your upper-level account empowered you to modify quotas, you could do this on the account settings page.
You may change the "Behavior when quota exceeded" from "Notify Only" to "Auto kill jobs" if you want a hard quota limit.